Let’s set the scene.
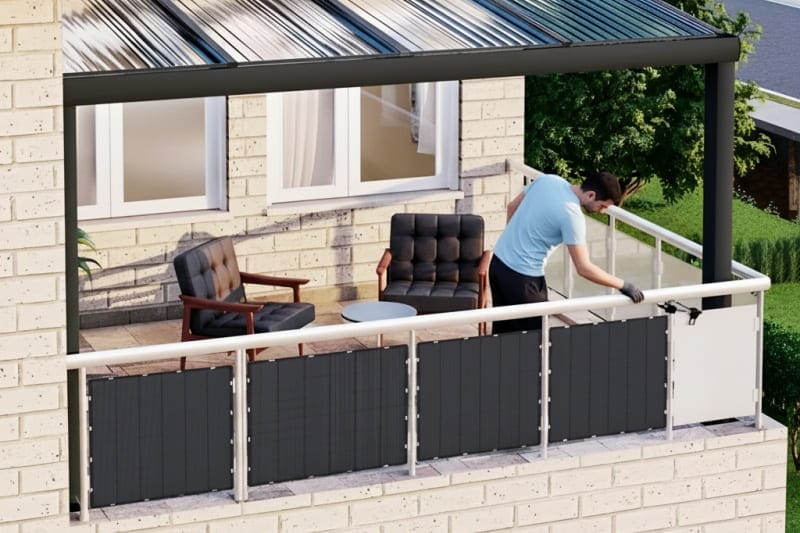
You were so excited. That new flexible solar panel looked amazing on the roof of your RV or the bimini of your boat. It was paper-thin, super light, and you didn’t have to drill any holes. It felt like the perfect solution.
For the first six months, it was probably great.
Then, maybe after one really hot summer, you notice something’s off. That 100-watt panel is now only giving you 60 watts. A few months later? Maybe 20.
If you’re nodding your head right now, I promise you, you are not alone.
This isn’t just bad luck. It’s a predictable (and preventable) engineering and sourcing failure.
We’ve been working with off-grid solar for over a decade. Based on 1,200+ panels field-tracked since 2023, units installed with a ≥10mm air gap showed <5% annual power drop, versus >20% power drop when flush-mounted.
The difference wasn’t the panel brand. It was how it was made and how it was installed.
This guide is for everyone—from a DIY RVer to a B2B sourcing manager. We will pull back the curtain on the “invisible killers” (micro-cracks and heat) and give you a simple, data-driven plan to buy and install panels that actually last.
Table of Contents
Your “Cheat Sheet”: Key Takeaways
I know this is a long guide, so here are the most important points right up front.
- The #1 Killer is Trapped Heat: Most panels don’t “flex” to death; they “cook” to death. Gluing them flat to a roof traps heat, causing micro-cracks and hot spots.
- The #1 Sourcing Rule: ETFE > PET. Do not buy a panel with a cheap PET surface. It will cloud, crack, and peel (delaminate). Insist on the tougher, more durable ETFE surface.
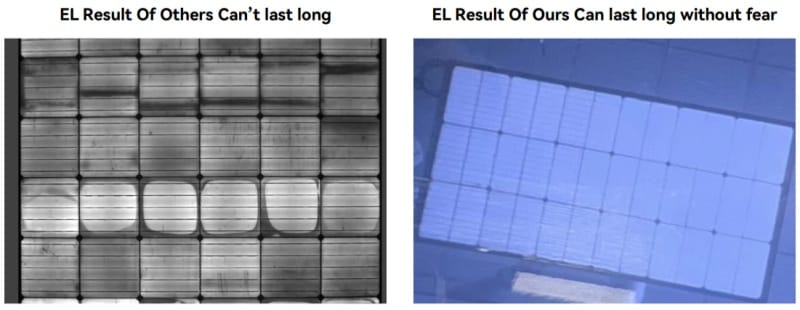
- The #1 QC Rule: 100% EL Testing. Do not buy from any supplier who cannot provide a 100% pre-shipment EL (Electroluminescence) test report. This is the only way to see hidden cracks from the factory.
- The #1 Installation Rule: The Air Gap. A flexible panel installed without a 10mm-15mm (1/2 inch) air gap for cooling is a failed panel. It’s just a matter of time.
Flexible vs. Rigid: The Data-Driven Comparison
This is the first decision. A rigid panel is a tank. A flexible panel is a high-performance tool that needs care. If you don’t need the light weight or flexibility, a rigid panel is always more durable.
Flexible Panels vs. Rigid Panels
| Feature | Flexible Panels (High-Quality ETFE) | Rigid Panels (Classic Glass/Alum.) |
| Efficiency | Good (16-20%) | Excellent (18-23%) |
| Lifespan | Short (3-10 years) | Very Long (25+ years) |
| Cost (per Watt) | Higher | Lower |
| Weight | Extremely Low (avg. 4-5 lbs / 2kg) | Heavy (avg. 15-20 lbs / 7-9kg) |
| Install Difficulty | Easy (Adhesive/Zippers, No Racks) | Moderate (Requires Racks & Drilling) |
| Durability | Low (Fragile plastic/cells) | Very High (Tempered Glass/Alum. Frame) |
Summary: Flexible panels win on weight and versatility. They lose on lifespan and durability. This guide is about how to get the maximum possible lifespan from them.
The Ultimate Sourcing Guide (The “Prescription”)
This is the solution, Part 1. A panel’s failure is 90% determined by what you buy. Here is how to buy the right one.
Key 1: The Surface (The “Armor”)
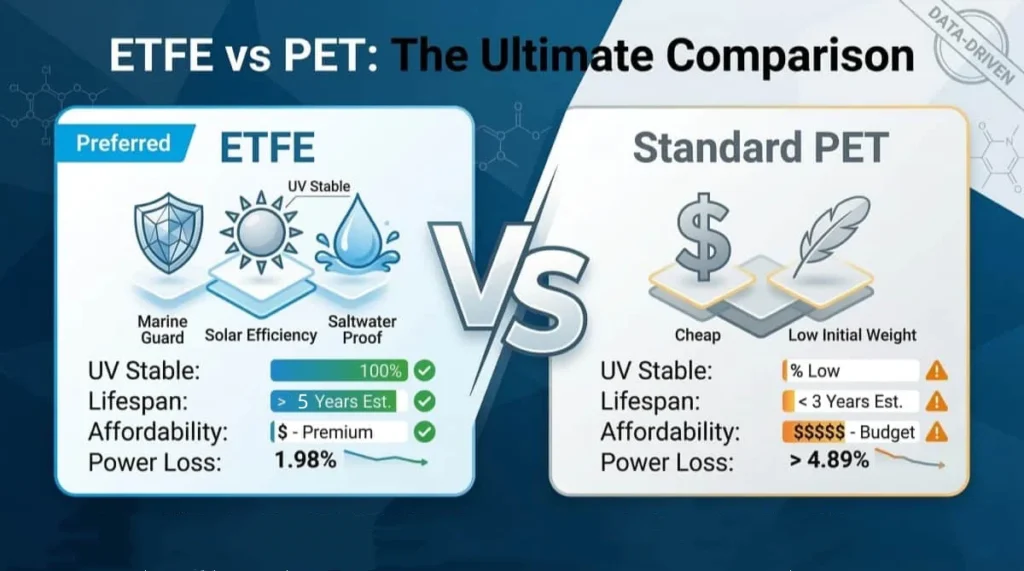
- The Problem: Cheap PET plastic will delaminate, crack, and yellow under UV and salt spray.
- The Solution: Insist on an ETFE surface. It’s a high-strength, UV-resistant polymer that won’t peel or cloud over.
Flexible Solar Panel Surface: ETFE vs. PET
| Feature | ETFE (The Standard) | PET (The Problem) |
| Durability | High (Industrial grade) | Low (Scratches easily) |
| UV Resistance | Excellent (Resists yellowing) | Poor (Degrades and yellows fast) |
| Lifespan | Longer (5-10+ years) | Shorter (1-3 years to failure) |
| Heat Resistance | Excellent | Poor (Prone to delamination) |
| Price | Higher | Lower |
Key 2: The Proof (The “X-Ray”)
- The Problem: Panels can be full of invisible micro-cracks from the factory.
- The Solution: Demand 100% pre-shipment EL (Electroluminescence) Testing.
- Your Buyer’s Superpower: Ask the supplier: “Can you provide the EL test images for my specific batch?” A quality supplier can. If they can’t, walk away.
Key 3: The Data Sheet (Your Sourcing Checklist)
Here is what to look for on the Technical Data Sheet (TDS), and what it actually means.
Sourcing Compliance Checklist
| Specification | What to Look For (and What It Means) |
| Temp. Coefficient (Pmax) | -0.35%/°C or lower |
(In plain English: This is the panel’s grade for heat. A lower number is better, meaning it loses less power on a hot roof.)
Min. Bend Radius | ≥ 1000mm (or as specified) (In plain English: This is how tight you can bend it once for install. It’s not for repeated flexing. Bending it tighter will crack the cells.)
Junction Box | IP67/IP68 & “Potted” (In plain English: IP67/68 means it’s waterproof. “Potted” means the box is filled with solid resin, sealing all connections from vibration and salt-fog.)
Standards / Certs | IEC63163:2021 (In plain English: This proves the panel has passed international standards for performance and safety. A non-certified panel is a gamble.)
Product Warranty | 2-5 years. (In plain English: This covers defects like delamination. A 1-year warranty is a major red flag that the manufacturer doesn’t trust their own product.)
The 5 Rules for Installation (The “Cure”)
You bought the right panel. Now, let’s install it correctly to prevent failure. This is Solution, Part 2.
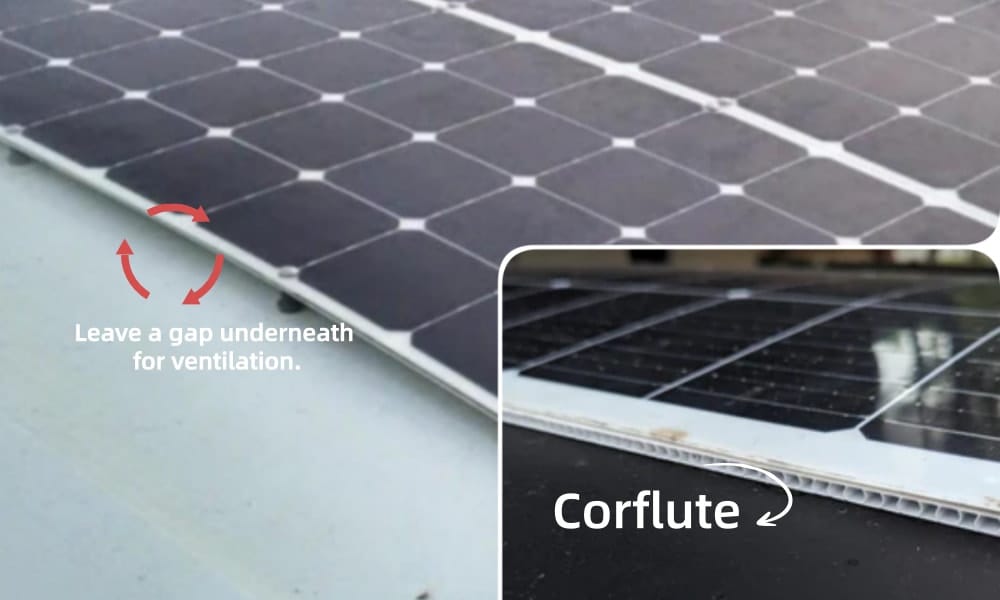
Rule #1: The Air Gap is Mandatory
A panel glued flat to a roof will overheat and fail. You MUST create an “air gap” of at least 10mm-15mm (1/2 inch) between the panel and the roof. This allows air to flow and cool the panel. A simple way is to use strips of Corflute (corrugated plastic) as spacers.
Rule #2: Respect the Bend Radius
The panel is “flexible” for a one-time install on a gentle curve. It is not a yoga mat. Never fold it, crease it, or bend it tighter than its “Minimum Bend Radius” spec.
Rule #3: Never, Ever Step On It
A single footstep or knee-drop can create thousands of micro-cracks and instantly kill a panel. Treat it like you would treat thin glass.
Rule #4: Clean Gently
Never use a high-pressure washer or an abrasive brush. This will scratch the ETFE surface and force water past the seals. A soft cloth and mild, soapy water is all you need.
Rule #5: Match Your Controller (MPPT)
Your charge controller is the “brain.” You must go into your controller’s settings (usually in a phone app, like VictronConnect) and make sure the voltage/current settings match the Vmp and Imp specs on your panel’s data sheet.
The Anatomy of a Failure (The “Why” Behind Our Rules)
So, what happens if you ignore this advice? Why are we so insistent on an “air gap” and “ETFE”?
This is the “why.” This is the autopsy of a failed panel, based on the three main causes of failure.
Cause #1: Mechanical Stress (Stepping On It, Bending Too Far)
This is what happens when you ignore Rule #2 and Rule #3.
- The Effect: Micro-Cracks (The “Invisible Killer”) This stress immediately creates micro-cracks, which are tiny, invisible fractures in the solar cells. You cannot see them. A panel can look perfect out of the box but be fatally damaged. This is why the
EL Test(from our Sourcing Guide) is so crucial.
A micro-crack acts like a broken highway for electricity. Current gets jammed, which causes “Hot Spots”—where the panel literally burns itself out from the inside.
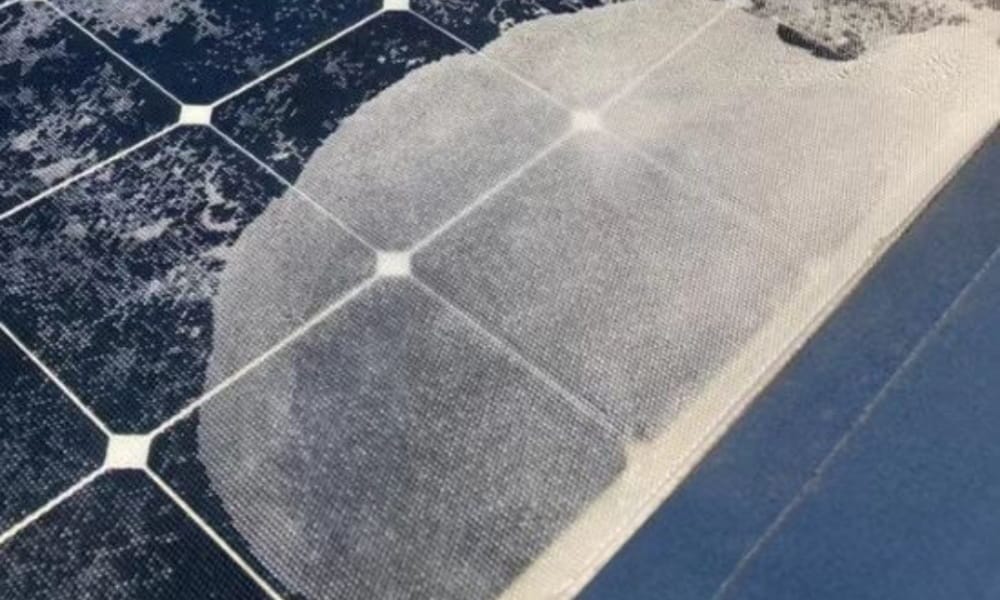
Cause #2: Environmental Factors (Moisture, Salt & UV)
This is what happens when you buy a cheap PET panel (from our Sourcing Guide) and use it on a boat.
- The Effect: Delamination & Corrosion This environment causes Delamination—where the cheap top PET layer peels away from the cells. This is a fatal flaw. It allows water and salt to get in, corroding the internal wiring and rotting the panel. This often starts at a poorly sealed Junction Box (which is why we check for an “IP68” rating).
How to Diagnose a Failing Panel (A 4-Step Field Test)
Already have a panel that’s performing poorly? Now that you know the causes and effects, here is how you can diagnose it.
If you shade one cell and the entire panel’s output drops to zero, you have found your problem. This confirms the internal circuits are shattered by micro-cracks.
Step 1: Check the Obvious. Is the panel clean (no bird droppings, no heavy dust)? Is it shaded by a vent or antenna?
Step 2: Check the Connections. Are the MC4 connectors tight? Is the charge controller (e.g., a Victron MPPT) showing an error code?
Step 3: Look for Physical Damage. Do you see the obvious “delamination” bubbles or junction box corrosion we showed above?
Step 4: The “Shadow Test” (My Pro-Tip for Micro-Cracks). On a sunny day, while monitoring the live power output (in Watts):
Use your hand to cast a sharp shadow over one single solar cell.
Watch the power output. On a healthy panel, the power will drop slightly (e.g., -5%).
Get the Tools & Help You Need
You have the knowledge. Now, choose your next step based on your needs.
Request your EL report or engineering consultation below.
FAQ (Frequently Asked Questions)
Q1: What does an EL test prove for flexible panels?
A1: Micro-cracks are invisible fractures in solar cells—see section above for how EL tests detect them.
Q2: ETFE vs PET in a marine (salt-fog) environment?
A2: ETFE withstands UV and salt-fog per lEC 63163 tests; PET does not.
Q3: What is the “minimum bend radius” & how does it impact the warranty?
A3: The relationship is direct: If you bend the panel tighter than its “minimum bend radius,” you will void your warranty. The “minimum bend radius” (e.g., ≥ 1000mm) is the tightest curve it’s designed for during a one-time installation. It is not designed for repeated flexing. If you “force” the panel onto a curve tighter than its rating, you will instantly create internal micro-cracks, and the manufacturer will reject your warranty claim on that basis.
Q4: What are the correct MPPT settings for a 12V system (Vmp/Imp ranges)?
A5: There is no “universal” Vmp/Imp setting—every panel is different. You must look at the data sheet (spec sticker) on the back of your specific panel. Find the two key numbers: Vmp (Voltage at Maximum Power) and Imp (Current at Maximum Power). Then, you must go into your MPPT controller’s settings (like in the VictronConnect app) and ensure the configuration matches those exact numbers. If the settings are wrong, your charging efficiency will be very low, and you could even damage the panel.
Flexible solar panels are neither good nor bad by default. They simply require clearer use cases and limits. If you want to avoid common sourcing mistakes before they happen, we explain our partner approach transparently.